Community targets build and publishing
About this document
This document describes the recipe to setup the build and publish of new Community targets.
Introduction
The build of each of the Community targets is a job in Azure Pipelines yaml.
The build of each target is triggered by checking the respective tick box in the PR description (comming from the PR template) or checking [] ALL. Note that it's possible to check more than one token to be build.
Setup the build for a new target
Update the azure-pipelines.yml in the Community repository as follows:
Start by adding a new job to the collection. Preferably copy/paste from a similar target.
Make sure to use the target name at the various places where it shows, namely: job name, condition expression and variables.
Update the PR template by adding the new target name in the checklist.
Setup the image publishing
Community target images are distributed through our Cloudsmith repository.
The 1st build that generates the package has to happen so that it's actually created in the repository.
Go to the package page of the recently created package and grab the markdown from the "Badges" tab (make sure to grab the one for the latest version) and paste it in the targets list at the readme file.
PRs and manual builds
When merging a PR make sure to add to the commit message the token(s) for the targets to build, otherwise the merge to the master branch won't trigger a build for any board.
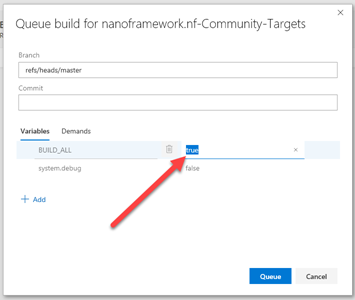
It's possible to manually start a build and specify that it should build all targets. This is most handy, for example, after a number of changes in the nf-interpreter repo to build new images for the Community targets. Another situation is when one forgets to add the build token in the PR merge and needs to trigger a build afterwards.
To do this, go to the Builds page in the project Azure Pipelines and hit the 'Queue' button. When the pop-up shows, change the BUILD_ALL variable to 'true'. Like this: